Watermarking your pictures or photos is a great way to protect them from people trying to steal them or use them without your permission.
I got a couple of requests to walk people through how I do this, so here is how I created a custom watermark for my blog photos.
There are computer programs out there that you can purchase that strictly do watermarking, but here is one option you can use. If you use a free photo editor online (Ipiccy.com, or picmonkey, canva) you can apply this tutorial as one extra step when you're editing your photos.
For this tutorial I am using Ipiccy
OK, let's get started and create a watermark! Go to your favorite online photo editor, login in using whichever method you prefer. Some give you the ability to use your Facebook account if you like.
Click on "Make a Design" and choose a size. I like a horizontal rectangular one, so I made mine wider than it is taller. Mine as you see below is 1000 pixels x 350 tall.
If you want a vertical rectangle then I would do 500 x 1500. Before you click the "create" button, click the TRANSPARENT button at the bottom when choosing a size. You don't want a colored background showing up on top of your photos.
I like a ratio of "thirds" when deciding my size. Whatever width I want, I do a third for the height. But you can play with sizes and find out what works for you. Plus, you can always shrink your watermark down, if it is too big.
Once you've done that you should see this:
Now we can play with the fun stuff. Click the Text button (It's the "T" for text). The picture icon will is where you can upload a picture to insert into your watermark. The heart is where you can add shapes.
Let's do text first.
A text box will pop up, so type in your blog name or domain name. One the lower left, choose or play with your font. Find one you like that fits your style.
Please Note - when using white colored font on a transparent background, you won't see it until you add it on top of your photo. One way to fix this (when creating a watermark) is:
Click the heart icon, create a large colored shape or box and color it black, grey blue and enlarge it to cover the entire watermark box. You can delete it when your done, so this is just for the purposes of seeing your white blog colored name. If your blog name is now hidden, you can right click it with your mouse and choose "Bring to front". This will put your Blog Name Text Box on TOP of the colored shape you just created.
Any of the layers or text or shape boxes you create you always have the same choices. You can duplicate them, flip them send it to the back or front. (if you want to try a new color, switch it so you have a horizontal version and a vertical version. This is where you can really play with color, size, etc.)
Below I clicked on the heart icon, found a pretty graphic I liked and dragged it over toward my blog name. I changed the color to match my blog name, changed the size, placed it where I wanted.
Don't worry, I can still move it around, it's not permanent yet. I can also use my mouse, right click on it and choose "duplicate", then flip it.
Now I have the same graphic on each lower corner but one is right side orientated and one is left.
Below - I clicked on the heart ion (shape box), chose a black box and made it a long rectangle. I duplicated it 2 more times so I had 3 long rectangles all grey.
The middle one I shortened, and changed the color, along with the 3rd. Then I right clicked (with my mouse) on each one and "sent it to the back. See how the long boxes are now behind my textbox, but still showing up...
Pretty cool huh?
Ok, let's save your new watermark.Click the orange check mark in the upper right hand corner. It will ask you if you want to combine all the different layers or boxes you added. (if you added a dark colored box just to see your white font. Choose no, and remove it now by clicking and dragging it away from your watermark, then click the trashcan to delete it)
Then click yes. Now your ready to save your watermark to your computer. Save it as a .PNG file so the transparent background stays crisp and clear.
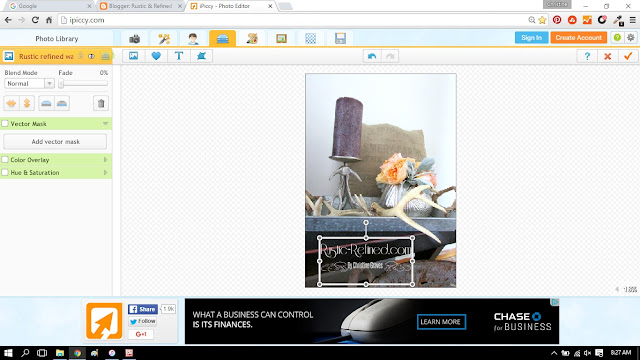
Now you're ready to add your watermark to a photo. Upload a photo of your choice and edit it as you normally would. Once done, then click the blue icon that looks like papers stacked on top of each other.
One the left hand side, click upload photo and upload your newly created watermark.
Insert it by clicking on your watermark and dragging it to your photo.
Place it and size it how you need, then click save.
That's it! You just watermarked your photo.
XO,


