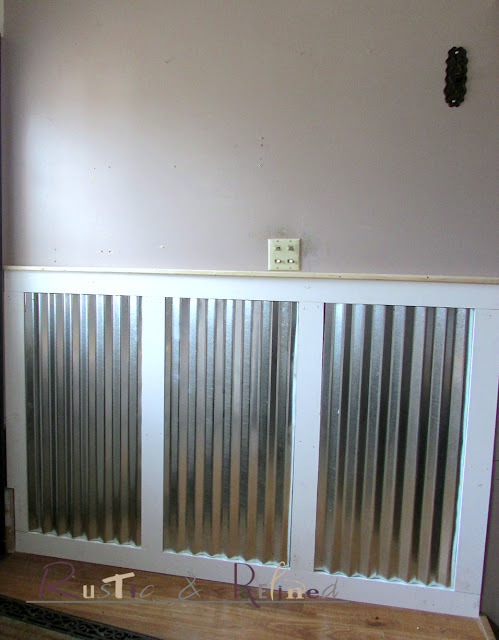
I thought you'd appreciate an update on how the wainscoting is coming for the back entry. Using Galvanized tin and pre-primed lumber to add that Industrial look.
Let's take a look at how my backdoor used to look like.
Yeah, me the purple lover is going white. This area gets a lot of sun but the color and the walls needs some love and attention.
This back entry gets a lot of use. "G" took out the current old baseboard and then we started laying out how we wanted the wainscoting.
I contemplated running it horizontal or vertical.
Vertical won out in the end.
Blitz was supervising "G", helping with milk bone break time and measuring.
After adding the pre-primed pine in the layout we wanted with the spacing to be able to simply insert the tin panels, I had "G" cut a scrap piece of lumber for the top, as a cap rail or decorative piece.
This will get painted white along with the rest of the wood. I am thinking a high gloss durable enamel.
The back door is also going to go all white. "G" originally asked that I keep the black trim and being tired on that day I relented.
Well, I am not tired anymore, so it's going white too.
Cuz I HATE the black and white door!
I think it looks stupid.
I might also add a new light fixture, that one is one that used to be over my kitchen table about 100 years ago. I still hate it, but it functions for now.
Here it is close to being finished.
I started priming the walls and the top cap rail.
The light switch is being updated also while we're working back here.
Because it needs it.
Unfortunately the new white covers exactly the same as what was installed in 1965 are not found anymore, so I bought new toggle switches. Buying a 4 light switch that runs "landscape" all in a row would have meant taking out the electrical box and installing a new one.
That would have also meant drywall cutting & patching, more $$, more time, so I found toggle switches that would work with a new plate. I want this finished and to not turn into a 3 weekend project!
Once that's installed and I finish painting, I'll show you the finished version.
But we're close!
We used small nails to temporarily hold the tin in place, because screws are going to be needed. The flexibility of this thin galvanized metal needs something stronger to hold it in place. So we're thinking small screws with galvanized washer to stick with the industrial theme.
So that maybe they look like "rivet"?
Hubby has his Spring 4 wheeling extravaganza today with his friends, so I have the house all to myself.
And my paint brush!
I'll keep you updated how on this goes.
UPDATE: To see how the finished project you can see Part Two here.
XO,


2 comments
Looks Great! Could you tell me the thickness and or where you purchased the metal, please?
It was purchased here at Home Depot:
https://www.homedepot.com/p/Fabral-12-ft-Galvanized-Steel-Roof-Panel-4736008000/202285067?source=shoppingads&locale=en-US&mtc=Shopping-B-F_D22-G-D22-22_10_ROOFING-Generic-NA-Feed-LIA-NA-NA-&cm_mmc=Shopping-B-F_D22-G-D22-22_10_ROOFING-Generic-NA-Feed-LIA-NA-NA--71700000044086327-58700004607994977-92700044043517421&gclid=Cj0KCQjwyZmEBhCpARIsALIzmnKWSHFpd2X5ZsJzXu9vBbqUUgJSnb8DYkoQtUGog5E6qJteoudrrhYaAtNkEALw_wcB&gclsrc=aw.ds
Post a Comment